A Practical Guide to Projection Mapping for Small & Medium Events
Projection mapping is no longer reserved for massive festivals or corporate mega-productions. Today, with compact projectors, intuitive software, and modular scenic design, small and medium-sized event producers can harness this technology to elevate experiences with immersive visual storytelling. Whether you’re programming for a boutique music festival, a community theater, or an art installation, projection mapping can turn ordinary surfaces into vibrant canvases of light and motion.
This guide explores the technical, creative, and logistical aspects of using projection mapping at small to mid-size events. For those unfamiliar with the term “projection mapping” here’s a primer.
🎥 What is Projection Mapping?
Projection mapping is a technique where video content is precisely aligned to 3D surfaces or irregular shapes, turning them into animated displays. Instead of projecting on a flat screen, the system maps visuals onto set pieces, LED sculptures, buildings, or moving elements.
Using Projection Mapping for a Concert or Festival: Where Does One Start?
Like any project, your first task is to determine what you want to achieve by using projection mapping
🎯 1. Define Your Theme and Visual Intent
Ask yourself:
- What is the theme of my event? The visual content, no matter how it is conveyed, should align with the event’s overall theme or message. Decide how the visuals will support the event’s narrative.
- What do I want the audience to feel or experience visually? Is it surprise, immersion, interactivity or some other experiential feeling? Will it be used to promote a brand, tell a story, or create an atmosphere?
- Will the visual content run continuously or at specific cue moments?
📌 Start with the concept — not the gear
🏗 2. Identify Your Projection Mapping Surfaces
Once you have what you want to accomplish clearly defined, it’s time to evaluate what is available to work with, i.e., the surfaces you can use for projection mapping. Remember that surfaces must be rigid and fixed, no swaying scrims, bouncing flats, or drum risers that will be relocated.
Make a list of potential projection surfaces at your venue or event:
- Flat backdrops, risers, scrims, or scenic cubes?
- Stage towers or façade elements?
- Can you build or place anything specifically to be mapped?
Analyze the chosen elements and their surfaces: Determine surface dimensions: Measure the width, height, and potential depth of the surface(s) to be mapped. Consider their material, color, and texture. Consider integrating architectural features: How can the surface’s unique characteristics be incorporated into the visual design? Even irregular surfaces can be mapped, but they require more preplanning and accurate 3D rendering.
✅ Tip: Smooth, matte, light-colored surfaces are ideal for optimal brightness and visual quality. Avoid glossy or dark materials unless you’re doing edge outlines only.
Identify potential obstacles: Note any elements that might interfere with the projection. For stages, that might include banners, speaker arrays, repositioned drum risers. If you are using other architectural elements in the area, be sure to note any issues with those as well.
🖼 3. Consider Environment & Lighting
Ask yourself the following.
- Is the event Indoor or outdoor?
- If outdoors, will it be during nightime or daylight?
- How much ambient light will be in the space?
- Will there be stage lighting interfering with the projection zones?
Projection thrives in darker, controlled environments. Outdoor events benefit from dusk/night scheduling. Rigging points, stage layout, and power access all play into projector placement.
💡 Projection needs contrast. Keep mapped areas out of bright washes.
🧠 4. Understanding the Core Technologies Involved
Here’s a clear breakdown of the technology used in projection mapping, organized to help you understand how it works — and what components you need to bring a mapped experience to life:
- Projectors
The projector is the light source. Key specs to understand:
- Lumens (Brightness): Higher lumens (10,000–30,000+) are needed for bright environments or large surfaces.
- Resolution: HD (1920×1080) or 4K preferred for clear visuals on detailed surfaces.
- Throw Ratio: Determines how far back the projector must be to fill a surface.
- Short-throw lenses are great for tight spaces.
- Lens Shift/Zoom: Allows off-center mounting and flexible alignment.
🔧 Popular Projector Brands: Epson, Barco, Panasonic, Christie, Optoma
- Media Servers / Playback Systems
A media server is the brain of the system — it stores, plays, manipulates, and outputs the visuals.
Common Features:
- Content playback (video, images, generative graphics)
- Real-time warping and masking
- Multi-output routing for multiple projectors
- Cue triggering (via keyboard, MIDI, OSC, or timecode)
- Interactive control (from sensors or controllers)
Popular Software:
| Tool | Best For |
| MadMapper | Entry-level 2D/3D mapping, LED control |
| Resolume Arena | Live visuals, VJ performance |
| TouchDesigner | Custom interactivity, generative art |
| Disguise (formerly d3) | Pro touring, large-format shows |
| HeavyM | Easy plug-and-play mapping |
- Control Protocols
Projection mapping often interacts with other systems via standard protocols:
- MIDI: Trigger cues from a pad or keyboard.
- OSC (Open Sound Control): Communicate between apps (e.g., Ableton triggering MadMapper).
- ArtNet / DMX: Integrate lighting controls and projection cues.
- Timecode (LTC, SMPTE): Sync with show lighting, sound, and pyrotechnics.
- Mapping & Warping Techniques
To align video with physical objects, mapping software uses:
- Vertex warping – drag corners to match surfaces
- UV mapping – align visuals with a 3D model
- Masking – hide parts of the video that don’t hit the surface
- Edge blending – smooth the overlap between two projectors
These tools allow you to precisely conform your visuals to real-world structures.
- Projection Surfaces
The surface matters. Good surfaces are:
- Light-colored and matte (white, light gray)
- Rigid and stable
- Modular (cubes, panels, risers) or architectural (buildings, truss towers)
Some artists use fabric, foamcore, PVC flats, or printed scenic backdrops. Others map directly onto buildings, vehicles, or landscapes.
- Optional Tech Integrations
Want to add interactivity or polish?
- Sensors (e.g., Kinect, Leap Motion) for motion-reactive visuals
- LED tape and pixel mapping for hybrid projection + lighting looks
- Audio reactivity via sound analysis tools (built into Resolume, TouchDesigner)
- Remote triggers using iPads, MIDI pads, or wireless cues
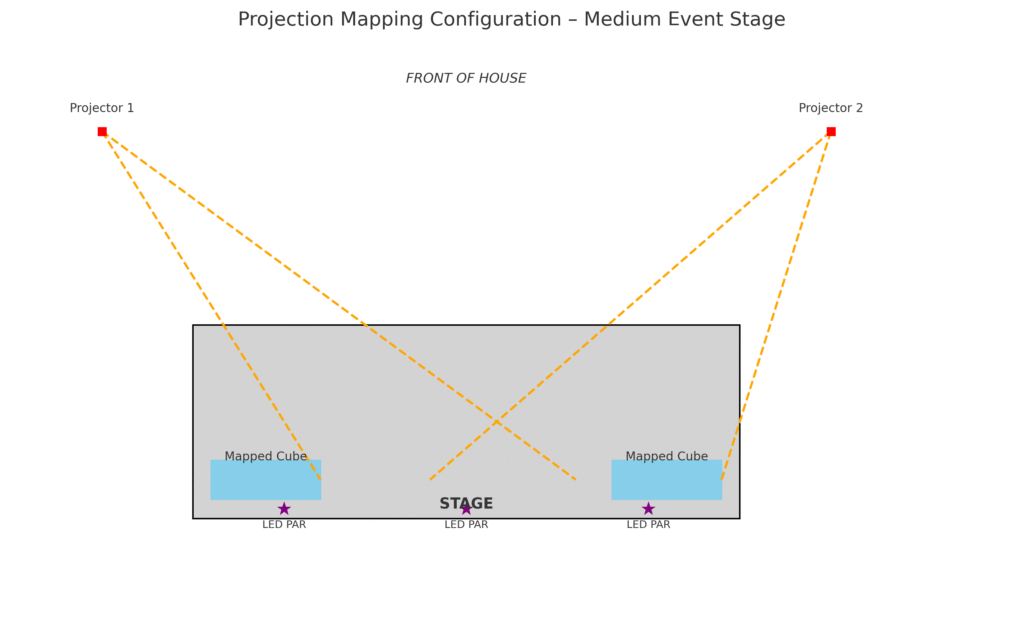
🔍 5. Measure Throw Distance, Space, and Beam Path
Measure the distance from the projector location (FOH or truss) to each surface. Consider audience sightlines. Avoid obstructing the projection path with trusses, lighting trees, or line arrays. Ultra-short throw lenses help in tight quarters. Consider alternative angles (e.g., side projection).
🧮 Use this distance and path to calculate:
- Throw ratio
- Lens type (short throw? standard?)
- Mounting height and angle
Manage Projected versus Other Lighting
Ambient Light: Projection mapping thrives in contrast. Avoid using projection before full darkness unless you use ultra-bright projectors (20,000+ lumens).
- Use physical barriers, e.g., black backdrops, stage hoods, or other means to control ambient light to maintain visibility.
- Design projection zones with truss towers or scenic flats that provide shade from other fixtures
- Keep projectors out of direct light spill from moving heads or follow spots
- Use low angles or floor mounts to reduce exposure to ambient beams
- Position projectors as close to surfaces as possible using short-throw lenses
Stage Lighting: Stage lighting can present challenges when using projection mapping. Consider these techniques to minimize the impact of stage lighting on projection mapping.
- Use Lighting Fixtures with Precision Control. Equip fixtures with barn doors, shutters, or framing gobos. Use ETC Source Four, Vari-Lite, or Ayrton fixtures for tight focus. Apply iris control to narrow the beam away from mapped surfaces
- Program Lighting Cues That Fade or Blackout. Fade down front lights during projection highlights. Use timecode, MIDI, or OSC to sync lighting and projection cues. Trigger lighting chases that accent projection instead of overpowering it.
- Color Temperature Matching. Projection usually runs at 5500–6500K (cool white). Set stage lights to warmer tones (3200–4000K) to avoid flattening contrast. Don’t oversaturate washes in amber, green, or magenta — they can compete with projection hues
⚡ Practical Lighting Integration Tips
Lighting Challenge – Solution
- FOH wash spills onto projection – Use side or top lighting only during mapped moments
- Line arrays block projection – Shift beam angle or mount projectors off-center |
- Stage lights overpower visuals – Fade stage lights to 30–50% during mapped cues
- Lighting blocks focus zone – Use precision beam shaping and gobo framing |
✅ Summary Checklist
- Map projection surfaces away from key light zones
- Use barn doors, gobos, and shuttering fixtures
- Sync cues between lighting and projection operators
- Test color temperature and brightness in venue
- Build lighting states that support — not compete with — projection
🎨 6. Design Principles That Work Well: Simplicity Is Power
✅ High Contrast
- Projection thrives in bold, contrast-heavy visuals. Use bright motion on dark backgrounds.
- Avoid fine gradients or subtle textures unless viewing in total darkness.
✅ Slow, Intentional Motion
- Fast motion gets distorted on textured surfaces.
- Use easing curves, fades, and pulse rhythms synced to audio or lighting.
✅ Layered Animation
- Use background textures + foreground effects
- Animate in z-depth or parallax for 3D illusion
✅ Color Strategy
- Pick a color palette that complements stage lighting.
- For brand integration: use accent hues from logos.
- Limit to 2–3 dominant colors per cue for visual clarity.
✅ Interactivity
Consider:
- Pulsing animations
- Audio-reactive backgrounds
- Looped patterns synced with BP
- Use sensors (Leap Motion, Kinect) or crowd input (MIDI pads, OSC apps) to trigger content.
- TouchDesigner excels at interactive projection setups.
✅ Scenic Integration
Design scenic elements (risers, towers, cubes) specifically to be projection targets. Modular props wrapped in PVC or muslin become compelling canvases.
📋 7. Plan Setup, Crew, and Cue Sheets
Time and Labor:
- Mapping takes time. Plan:
- Minimum crew: 1 technician per two projectors
⏱️ Load-In and Tech Time
| Component | Time Estimate (Typical) |
| Unload & gear setup | 1–2 hours |
| Projector rigging | 1–3 hours (depends on truss or risers) |
| Surface measurement & mapping | 2–4 hours |
| Media programming & cue testing | 2–4 hours |
| Final full-show rehearsal | 1–2 hours |
✅ Plan for 8–12 hours total for a two-projector setup with cue integration.
Power and Safety
- Each 20K lumen projector can pull 15–20 amps.
- Use isolated circuits or generators with surge protection.
- Secure projector stands or trusses with safety cables and weatherproofing if outdoors.
📋 Final Pre-Show Projection Mapping Checklist
- Surfaces secured and measured
- Projectors installed, powered, and aligned
- Cables tested and safely routed
- Content loaded and mapped correctly
- Lighting cues and projection transitions synced
- Cue sheet or show control script finalized
- Full run-through completed
⚠️ Considerations for Real-World Execution of Projection Mapping
🎛️ 1. Multiple Bands Require Cue Management
- Each artist may have unique visuals—or none. You’ll need:
- A unified visual theme or content pack with swappable layers.
- MIDI, timecode, or manual cue triggers for flexibility between acts.
- A trained visual operator who can load different timelines from Disguise Designer per set.
🔹 Tip: Use a modular approach—build a shared visual “base layer” (e.g., abstract loops, environmental elements) and add artist-specific overlays.
⏱️ 2. Tight Set Changes Mean No Recalibration
- You cannot remap or recalibrate between bands in a 10–15 minute turnover.
- Solution:
- Pre-map to a fixed set structure (e.g., upstage backdrop, scenic panels).
- Avoid mapping directly onto gear that moves (e.g., drum risers or mobile props).
- Use trackerless designs unless you have enough time to recalibrate (BlackTrax takes 10–30 mins per setup).
Final Thoughts
Projection mapping offers transformative potential—even on a tight budget and compact stage. It’s about planning, not just equipment. Focus on contrast, coordination, and creative storytelling. Whether you’re lighting up a single scenic element or building an entire immersive world, thoughtful integration of projection will elevate your event from ordinary to unforgettable.
Projection mapping can be more cost-effective than LED walls when surface and ambient light conditions are suitable. For larger impact or daylight shows, LED video walls may be more consistent.
📚 Projection Mapping FAQ
For Small to Mid-Sized Concerts, Festivals & Artistic Events
🎥 1. What is projection mapping?
Projection mapping is a technique that uses projectors to cast video content onto irregularly shaped surfaces—like set pieces, architectural elements, or custom-built props—transforming them into dynamic visual displays. It aligns video precisely with the contours of the surface to create immersive experiences.
🎯 2. How do I begin planning projection mapping for an event?
Start with your creative concept, not equipment:
- Define your event’s theme and emotional goals.
- Decide if visuals run continuously or are cue-triggered.
- Outline how projection supports storytelling or branding.
🏗 3. What surfaces can I use for projection?
Ideal surfaces include:
- Flat or rigid scenic elements (e.g., risers, cubes, stage towers)
- Architecturally integrated elements (walls, truss)
- Custom-built panels made of matte, light-colored materials
Avoid: Dark, glossy, or mobile surfaces like drum risers or swaying curtains.
💡 4. How does lighting affect projection mapping?
Projection needs contrast:
- Avoid bright stage lights on mapped zones.
- Schedule outdoor shows after dusk if possible.
- Use focused lighting, barn doors, or shutters.
- Match color temperatures to avoid visual clashes (projection = cool white, stage lighting = warm tones).
🌍 5. Can I use projection mapping outdoors?
Yes, but consider:
- Ambient light levels (projection works best after dark)
- Weatherproofing and rigging for safety
- Power access (high-lumen projectors need 15–20 amps each)
🧠 6. What equipment do I need?
You’ll need:
- Projectors (HD/4K, 10,000+ lumens, short-throw for tight spaces)
- Media server (for playback and warping)
- Software (e.g., MadMapper, Resolume Arena, HeavyM)
- Control (MIDI, OSC, DMX/ArtNet for cue integration)
🛠 7. What mapping software is best for beginners?
- MadMapper: Easy 2D/3D mapping
- HeavyM: Plug-and-play for newcomers
- Resolume Arena: Great for live VJing and layering
🔗 8. How do I sync projection with other show elements?
Use protocols like:
- MIDI or OSC for triggering
- Timecode (LTC/SMPTE) for syncing with lights or sound
- DMX/ArtNet for lighting integration
🧮 9. How do I calculate projector placement?
- Use the throw ratio to determine distance.
- Factor in beam path and avoid obstructions.
- Mount projectors off-center if needed; use lens shift and zoom.
🎨 10. What content design works best?
- High contrast visuals (bright motion on dark backgrounds)
- Slow, intentional animation
- Layered depth (background + foreground effects)
- Use 2–3 dominant colors per cue
- Sync visuals with audio or crowd inputs
🧰 11. Can projection mapping be interactive?
Yes. Integrate:
- Sensors (e.g., Kinect, Leap Motion)
- Audio reactivity (built into TouchDesigner, Resolume)
- Crowd inputs (MIDI pads, OSC apps)
📋 12. What does setup typically involve?
Plan for 8–12 hours for a basic 2-projector setup:
- Gear unload & rigging: 1–3 hrs
- Surface measuring & warping: 2–4 hrs
- Programming & cue testing: 2–4 hrs
- Rehearsal: 1–2 hrs
Minimum crew: 1 technician per 2 projectors
⚡ 13. How do I manage projection during fast set changes (e.g., multiple bands)?
- Use fixed mapping surfaces that don’t move.
- Avoid remapping during quick turnovers.
- Prepare modular visual layers (a shared base + overlays)
- Use media servers with saved timelines for different acts.
💰 14. Is projection mapping more cost-effective than LED walls?
Yes — when light conditions are favorable and surfaces are available. LED walls are more reliable in high-light or daytime scenarios but cost significantly more.
✅ 15. Final Pre-Show Checklist
- Surfaces secured and measured
- Projectors installed and aligned
- Content mapped and loaded
- Lighting and projection cues synced
- Power sources safe and isolated
- Full show run-through completed
Related Post: